Showing posts with label Pie Crust. Show all posts

Tuesday, October 20, 2009

Pumpkin Pecan Pie


Ok so, here's the entire truth about my personality disorders:

* I have OCD - an extreme aversion to anything perceived to be dirty and/or germy.

For example, my severe OCD does not approve of the following (just to name a few):
(1) Camping. For obvious reasons.
(2) Not washing your hands before eating, not washing your hands after coming home from being "outside," not washing your hands before entering my irrationally large personal bubble.
(3) Moms who will stick pacifiers back into their baby's mouth after it fell on the ground.

* I'm a perfectionist, to a flaw. I will drive myself crazy perfecting something. I will spend 10+ hours on something that requires 2, just so I can make it 110% perfect. This applies to all aspects of my life, from academics, to career, to baking. I don't ever put my name on something "sub-par," which is defined as anything less than 110%. I will meticulously research every aspect of one recipe for about a week before actually attempting it. Even then, if it doesn't turn out like how I expected, it's back to the drawing board, and the recipe in question does not make it onto the blog.

I'm sure my friends will tell you that I have other disorders, but for now, we'll just leave it at these two, because they directly pertain to how I bake and run this blog. =)

Ok so, I'm telling you all this because it relates to why I decided to post this Pumpkin Pecan Pie recipe. I was super upset when I pulled it out of the oven and it was ugly. I was even more mortified when it proved to be super un-photogenic. I panicked and thought: I must immediately find another pumpkin recipe to feature in the pumpkin series. (This is the third installment in the Welcome Autumn: Pumpkin Series.)

But then, the second I sank my teeth into this pie, my taste buds were jumping for joy. There was no doubt about it- this recipe was a huge success. Everyone who tasted it agreed unanimously that it was one of the best pies ever.

Needless to say, I experienced some major cognitive dissonance. My OCD told me that the pecans on top made it look extremely dirty and unappetizing, while the perfectionist in me screamed that something this unattractive should never be publicly displayed on my blog! I mean, I'd be so ashamed to post something that looked like a pile of mushy dirt and tell everyone to just take my word that it is, in fact, delicious.

Anyway, to my loyal readers: I hope that you will not judge me on these photos because the logical side of me won...eventually. After days of struggling with my inner turmoil, I knew that I could not deprive the world of this awesome recipe simply because of a few weird personality disorders.


So here it is in all its glory: the best-tasting-but-dirty-looking pie ever!


The basic necessity for a great pie: a special edition fluted Emile Henry Pie pan, exclusive to Williams Sonoma! It's a magical pan that produces perfect pies every time. I kid you not, it is indeed magical. (Click here to read all about it!)


Start by making the crust. Prepare it about 2 hours ahead of time. I always use this WS crust recipe, it's the best! And it's the only one I ever use. Please read the Apple Pie entry and its links for tips on working with pie crust, which can be tricky for beginners.


Once the pie crust is ready to go, prepare the the pumpkin pie layer.


Whip up the pecan layer and gently pour it over the pumpkin layer. GAH! None of the steps of this pie recipe are photogenic, either. lol. I'm cringing right now at the thought of having these pictures up on my blog. It's doing some major damage to my psyche as I type this. ;) Man, the lengths I go to just to share a recipe...


Bake at 375 degrees for 10 minutes, then reduce the heat to 350 and bake for about 50-55 more minutes until the sides are set. The center doesn't have to be completely set- it's ok if it's still a big gooey. When it cools, it will naturally become firm.


I love pumpkin pie. And I love pecan pie! What more could a girl ask for? Amazing crust with two amazing pies squished together in one! The pecan top was delightfully crunchy, while the pumpkin layer on bottom was melt-in-your-mouth gooey.

I urge all of you to give this recipe a try! Don't judge a book by its cover, right? Not all pies are created equal- some are more photogenic than others. And some pies rank superior among all others in terms of taste and quality. As far as I'm concerned, this pie takes the cake! Har, Har.

(Hubby's reading over my shoulder as I type this and he just informed me that the "cake" joke was super lame, even for him- the king of lame jokes. lol.)


For the recipes in this entry, click HERE.

The WS Pie Crust
Pumpkin Pecan Pie

(See links above for source)


Wednesday, September 30, 2009

Apple Pie

As promised, here's the first recipe in the Welcome Autumn: Apple Series!


I love apple pie! It's a classic that will never go out of style! Serve it up with some vanilla ice cream and you've yourself a little slice of heaven. Here is my go-to recipe, one that everyone should have in their recipe box! Not all pies are created equal...and this one ranks far above the rest. =)

Start with the crust. Prepare it about 2 hours beforehand because it needs to be refrigerated. To me, the crust is the most important part. Mmmm...carbs! As I always say: if you've got a fantastic crust, it doesn't really matter what you put in it! I've tried tons of pie crust recipes...some aren't flaky enough, others are too soft and difficult to work with, blah blah. None of them have stacked up to this one: the ultimate pie crust by WS. It's the only recipe for crust you'll ever need. I use it for everything from fruit to chicken! It has a great buttery and flaky texture- so delicious. And it's also easy to work with, which is super important.


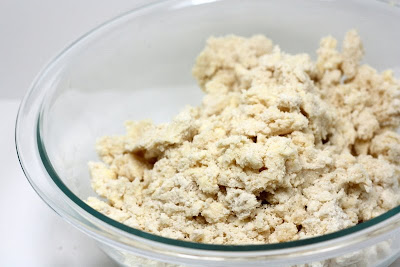
Combine ingredients in a food processor according to the recipe's instructions. When it comes out, it should look like this: kinda crumbly.


Gently push the dough together and form into two round disks. I like to make one slightly larger than the other, because the bottom crust will need more dough than the top. Wrap tightly in saran wrap. Refrigerate for at least 2 hours.


For more tips on working with pie crust, please read two of my older posts: (1) All about pies, and (2) Blueberry pie. Pie crust can be difficult to work with for first time bakers, so be sure to read these before attempting!


Next, start on the pie filling. See recipe below. I like this recipe a lot because it requires cooking the apple first to create a thick filling. I hate it when I get a runny, watery pie that makes the crust soggy!


Chop up about 6 large granny smith apples. The recipe calls for a dutch oven. But those things are so heavy and super expensive. Not everyone has one, so if you don't, any old pot will do!


Cook for about 30 minutes with a few fantastic ingredients: cinnamon, nutmeg, brown sugar, etc. It'll cook down to create a great pie filling!


Pour the filling into the pie crust you prepared earlier. Add a few cubes of butter throughout, then start on the top crust.


Creating a lattice can be tricky. You have to start in the middle of the pie and work your way out. Again, for first timers, please refer to my Blueberry Pie entry for tips and tricks.


I got these great star shaped pie crust cutters from WS! They came in a great set of four. For more info on these awesome cutters, see this prior post where I used them to make bite sized chocolate graham crackers!


The cutters are great! I love them. They really "fancy up" your pie! =)


Bake for about 45-50 minutes. Check on it half way through to make sure your crust isn't browning too much. If it is, cover the top with foil.


Mmmmm! Serve with vanilla ice cream!


Stay tuned for the second and third installments of the Welcome Autumn: Apple Series. Don't miss out on these two fantastic apple recipes to come:
  • French Toast topped with Caramelized Apple, Cardamom Whipped Cream, and Candied Walnuts.

For the recipes shown on this entry, please click HERE.


Monday, September 28, 2009

Welcome Autumn

Autumn is officially here! There's a definite chill in the air. And the rain is here to stay. It's the beginning of monsoon season in Seattle. =)

In order to celebrate the changing of seasons, I'm doing a two-part series that features two essential flavors of fall: apple and pumpkin! For each series, I will post three blog entries- three great ways to use each ingredient.

First up: APPLE!


Here are the three great apple recipes to look forward to:


(1) Apple Pie - always a classic!


(2) French Toast topped with Caramelized Apple, Cardamom Whipped Cream, and Candied Walnuts. YUM!


(3) Applesauce Spice Cupcakes, topped with a Caramelized Apple Swiss Meringue Buttercream. The chunks of apple in this butter cream = pure joy to your taste buds!


Make sure to check out all the great recipes in the Pumpkin Series!


Thursday, July 16, 2009

Product Review: All About Pies

So I'm just crazy about pies. Who isn't? I especially love pies that have a gorgeous thick and buttery crust- it's definitely the highlight of any pie! (mmmmm, carbs!)

The taste and texture of your crust will either make or break your pie. Simply put: if you've perfected the crust, you have yourself the perfect pie. What you put in it doesn't really matter. Any kind of fruit will do. Or chicken.

If you like baking pies... or eating pies, here are the two essential items you must have in your kitchen. They will work miracles and magically bake you the perfect pie. I mean it. It's pure magic.

A few weeks ago, I was browsing various kitchenware websites (this girl likes to shop) and I came upon an Emile Henry Pie Dish that had a ton of positive reviews. People were using words like "magic" and "only dish you'll ever need."

Intrigued that so many people were raving about it as if it was their first-born, I did some more research on its specs. Each pie plate is made by hand, out of Bulgundian clay. No kidding! They had this awesome video showing how it's made. I saw this plate still in wet clay form, sitting on a wheel, with a man smoothing out it's ruffles.. then hand dipping it in the red glaze. Amazing! It gets better. The clay distributes heat evenly, giving you the perfect golden bottom crust! (Have you ever baked a pie and was disappointed to see that your bottom crust was a white and soggy doughy consistency? Yuck!) The glaze finishing on the pan is scratch resistant to any kind of sharp pie server. It's also microwaveable, freezer safe, and dishwasher safe. Sweeeet! Plus, need I say that it's simply gorgeous?

Ok so, I had to have one. But when I saw the price, I almost had a heart-attack. $44 for one plate. And I thought "ok, with all the raving reviews, I have to try it out. I'll take it back if it's not up to par." So I brought it home and put it to work. I baked a pie and sent it over to Kelly's (my BFF). Immediately, her family noticed a difference in my pie quality. They couldn't stop raving about how yummy it was- especially the crust! So I ended up driving over to her house, sliced a piece, and flipped it upside down. Lo and behold- the bottom crust was a PERFECT golden brown. I wanted to cry. It was so beautiful. I had finally perfected my pie. And it tasted amazing! It was the best tasting pie I had ever made.

But ok, so along with this pie pan, I also made another splurge. I bought a $50 pastry mat and went through the same thought process... sooo expensive, will take back if it's not what it's cracked up to be. It also got excellent reviews and people saying that it's worth every penny. Upon first glance, you probably think you don't need one of these. But I was pleasantly surprised at how useful it really is.

First of all, it's huge. It takes up a good size of your counter, so it allows you to roll out a big piece of dough, even for the largest pie pan.

Second, it's non-stick. This quality makes it so that:

(1) You don't have to flour the surface or the dough at all. This is incredibly important, especially for pie dough because putting excess flour into your dough will change its consistency, which makes it harder to work with and it will ultimately change the texture and taste of your crust.

(2) It makes it so that delicate doughs like pie crust, lifts off easily, in one sweep. This is important, because when you're rolling out a large piece for the bottom crust, it is easy to break it when lifting it off of your rolling surface, if you don't have a non-stick surface (or if you're relying solely on flour as a non-stick mechanism).

The last quality is something people don't often think about, but it's an important factor to consider. The sticky back side of the mat makes it grip to your counter with the jaws of death. It won't move or slide on your counter when you're rolling. This is super important when rolling out pie crust because in mid-roll, if your rolling surface shifts under your weight, you'll get an uneven piece in terms of thickness, which will result in it baking unevenly.

At first I was skeptical about these two products and reluctant to shell out the cash. But now that all my pies have been turning out perfect every time, I'm a firm believer. I can't even remember what I used to do without them, in the dark ages. =)

Here are some pictures of my most recent apple pie. The fluted edges of the Emile Henry pie dish give it the most beautiful ruffles. (Sorry for the bad picture quality- took these on my blackberry). Now I really really want to get the mini 5 inch EH dishes so I can make cute little individual pies! Would it be perfect for chicken pot pie dinners?

I would definitely recommend these products to anyone who's into pie baking, especially if you're a beginner. It will make your life so much easier. To me, it's well worth the investment. They are two very high quality pieces and will last a very long time, if not a life time if you take good care of it. If you're still skeptical, I would suggest doing what I did. Buy it to try it out and if you're not completely won over like I was, you can always take it back! But I have a feeling that you won't want to part with either one of them! I have definitely noticed a difference in both quality and taste of my pies ever since working with these two amazing products!

If anyone feels inspired enough by this post to go out and try these two products, please leave me a comment about how you liked it! =)

Wednesday, July 15, 2009

Blueberry Pie

Ok so, after the muffins, I still had about close to 2 pounds of blueberries left. As it turned out, the dozen muffins I made earlier this week didn't actually require that many berries. So I started thinking...what dessert would require the use of a lot of blueberries? Pie, of course!

I found a blueberry pie recipie that looked good and modified it slightly to this:

INGREDIENTS
* 3/4 cup white sugar
* 4 tablespoons cornstarch
* 1/4 teaspoon salt
* 1/2 teaspoon ground cinnamon
* 4 cups fresh blueberries
* 1 recipe pastry for a 9 inch double crust pie
* 1 tablespoon butter

DIRECTIONS
1. Preheat oven to 375 degrees F.
2. Mix sugar, cornstarch, salt, cinnamon, and sprinkle over blueberries.
3. Line pie dish with one pie crust. Pour berry mixture into the crust, and dot with butter. Cut remaining pastry into 1/2 - 3/4 inch wide strips, and make lattice top. Crimp and flute edges.
4. Bake pie for about 50 minutes, or until crust is golden brown.


You'll have to make your pie crust in advance and allow at least an hour for it to sit in the fridge, so plan ahead. I would suggest 2-3 hours, for good measure. This will ensure that it's easy to work with. Use this pie crust recipie, and only this recipie from here on out~! I swear by it! I have searched high and low for the perfect pie crust recipie and have gone through many that were either too soggy to work with or didn't taste buttery and flaky like it should. This recipie gives you the perfect balance between taste and texture. It's also the easiest to work with- trust me, this is an essential element. You'll thank me later when it's not sticking to your hands and falling apart! =)

For the crust, follow the recipie and after you've completed all the steps in the food processor, pour the dough out into a bowl. It should look something like this:

You will find that it's really soft and super easy to mold. You don't have to kneed it or anything, just gently press the dough together with the palm of your hands until it forms a ball. Try not to play with it too much, the butter in it will start to melt and it will get messy! This is will make it harder for you to work with the dough and you will end up having to refrigerate it for longer. You will only need to press on it about 3-4 times to form something like this:

The recipe tells you to divide it in half and wrap it up. I find that it helps a lot if you divide it into two unequal pieces. Break the dough up into a 60/40 split like the picture below. You will use the bigger half for the bottom layer, which requires more dough. The smaller half will be perfect for making the lattice on top. Also, here are 2 tips that will help you later: (1) the more round you can make the balls, the easier it will be later when you roll it out. Make it into a ball, and then flatten it slightly so that it has a disk shape. This makes it super easy for you to roll out later. You can just set it down on your mat and roll... you don't have to be kneading and trying to shape it later. The heat from your hands will make the dough soft, soggy, and difficult to work with. (2) make sure you wrap the dough up tightly. I usually use two layers. This will keep the dough from drying out. Now you're ready to pop it into the fridge.

After much trial and error with pie crusts, I find that if you follow my instructions completely, you will have the ultimate buttery & flaky crust, as well as a very easy time working with it (which can sometimes be tricky). The rest of the process is pretty easy. Take the bigger piece of dough and roll it out so that it's slightly bigger in diameter than your pie pan. Make sure to apply even pressure when you're rolling out the dough, so that it is consistently thick throughout. This will ensure that you get a evenly baked, golden brown bottom crust.

Place the rolled out pie crust into your pan and even out the edges, cutting off the excess.

Place your pie filling inside. See pie recipe above.

Now roll out the smaller ball of pie crust and cut out strips for the lattice. You'll see in the picture below that I'm using a fluted pastry wheel to get the pretty edges. If you don't have one, you can use a pizza roller or a sharp knife to cut straight edges.

The trick to building the lattice is to place all the horizontal strips first and then start on weaving in the vertical strips starting from the middle of the pie. Start in the middle, work your way to the left. Then go back to the middle and work your way to the right. This is the best way to do it because: since the strips are so thin an narrow, if you touch them too many times, they will fall apart on you. So if you build your vertical strips from left to right, you end up touching the right side of the horizontal strips too much, making the butter melt.

The finished product!

Ok so I apologize for not having pictures of the pie after it was baked. I assure you that it was a beautiful golden brown. I'm using this old-school camera and it conveniently lost my "after" shots and told me I had to reformat the SD card! I didn't even know SD cards needed to be formatted. I went to go cut out a slice of it to re-take pictures but the entire pie had been eaten! No kidding! Guess it was a good recipie! =) Try it out and let me know how it turned out!
Related Posts with Thumbnails