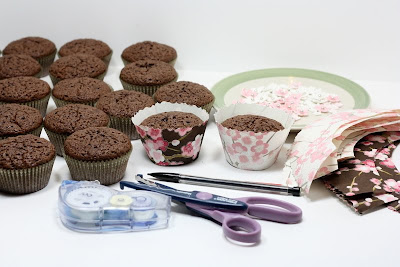
EDIT: People have been emailing, asking about the cherry blossom paper. I got it from Paper Source, a specialty craft/paper store. It's from their "Japanese Paper" collection. It comes in all different colors, and they're all so beautiful. Click on the link above to see all the varieties! One sheet of paper will give you about 19 cupcake wrappers.
~~~~~~~~~~~~~~~~~~~~~~~~~~~~~~~~~~~~~~
I'd like to take a brief intermission from the "Welcome Autumn: Apples Series" to wish happy birthday to Grace!
Grace is the "G" in GH Kim Photography, our wonderfully talented wedding photographers!

All of our family and friends were in awe of our wedding photos! They turned out so beautifully. G & H's artistic talent captured the magic of our special day flawlessly. I really couldn't thank them enough. So when I saw that Grace's birthday was coming up, I decided to show my appreciation by offering her my catering services!
I told Grace to pick anything she wanted from the collection of recipes featured on my blog. And of course, what better way to celebrate a birthday than with cupcakes. Salted caramel ones, no less! Excellent choice, Grace! =)

Since these were for a birthday celebration, any old salted caramel cupcakes wouldn't do! They had to be fancy ones. I wanted to make gum paste flowers to match the pretty cherry blossoms on the cupcake wrappers.

I started by making the toppers and wrappers. The necessary items: gum paste, silver beaded sprinkles, small white sprinkles, fancy wrapping paper, small flower cutters, edible sparkly pearl dust in pink, tiny brushes, fancy craft scissors, and various other gum paste tools.

First up: the TINY flowers. These could fit on the tip of your pinky. They're so cute! I used the smallest flower cutter I could find- not even a centimeter in diameter. After cutting them, I gently created a small dent in the middle of the flower, wet the tip of a gumpaste tool and stuck a tiny white sprinkle in the center. In retrospect, pink sprinkles would have been cuter.

The larger flowers were easier to make. Cut them out with a small cookie cutter, stick on a shiny silver bead, then paint it with the pink sparkly dust!

They turned out great!


Next, onto the wrappers. See my previous post on cupcake wrappers for more details.

On the day of, I baked the cupcakes and prepared the caramel Swiss meringue buttercream. Please see this previous post for the recipe and instructions.

After the cupcakes have cooled, assemble the cupcake wrappers. Do this by wrapping the wrapper around the cupcake and drawing a faint line in pencil. Then unwrap the cupcake and use double sided tape to create the cup.

On the day of, I baked the cupcakes and prepared the caramel Swiss meringue buttercream. Please see this previous post for the recipe and instructions.

After the cupcakes have cooled, assemble the cupcake wrappers. Do this by wrapping the wrapper around the cupcake and drawing a faint line in pencil. Then unwrap the cupcake and use double sided tape to create the cup.

Lastly, drop the cupcake into the wrapper/cup!

You'll need to have the same craft scissors you used earlier handy. You might have to trim down the wrapper before taping it together, to get it to be the correct height.

Now, here comes the best part! Frost your cupcakes with the caramel Swiss meringue buttercream and sprinkle with a pinch of sea salt. I used a super course one called Fleur de Sel.


