Showing posts with label Crostini. Show all posts

Sunday, November 28, 2010

Caramelized Pear & Brie Crostini

Wow. I can't believe that I received so many "welcome back" comments on my last post! I thought for sure that I had completely lost all my readers after being gone for so long! Thanks so much, everyone, for all your support! It really means a lot to me that you haven't given up on me/the blog. =) I will take pictures of my kitchen soon! I'm waiting for a good sunny day...which is rare these days in Seattle. hehe.

Whew! I meant to post earlier in the week, but I've been super busy with Thanksgiving. It's my favorite holiday of all time. What could be better than cooking, eating, and shopping?! Three of my favorite things rolled up into one holiday! Not to mention, a four-day weekend. =)

We always celebrate Thanksgiving on Saturday and for the past couple of years, I've been in charge of the entire dessert spread, which consisted of: (1) Pumpkin Cheesecake, (2) Apple Pie, (3) Pumpkin Pecan Pie, (4) Caramel Corn, (5) Peppermint Bark Dark Chocolate Brownies, and (5) Gingerbread cookies - all decorated in snowflake patterns! What made it on your dessert table this year?

My BFF Kelly and I are hardcore about Black Friday Shopping. We get up every year at 4am and shop 'til we drop! This year, I was extremely productive and finished all of my Christmas shopping! We woke up at 4am, shopped for 9 hours, then went home and rested for 20 minutes. After which, I baked for 8 hours straight and ended up going to bed at 1am! BEST DAY EVER.

Earlier today, Hubby and I put up the tree - a red and silver themed tree with sprays of cranberries and pine cones! We also wrapped all the presents with 4 different types of red and silver wrapping paper, to match. It's super beautiful!! All in all, it's been an incredibly productive and fun weekend! I hope everyone else had as much fun as I did!


Today's recipe is a toasted crostini, topped with Brie, Gorgonzola, caramelized cinnamon pear, and minced chives. The cheese is gooey and suuuuper creamy. The crostini is incredibly crispy and has a great crunch to it. This is one of my favorite recipes of all time. Yes, it's just that amazing.

(1) The Crostini


You'll need a baguette, preferably day-old. The trick is to slice it suuuuuper thin. The thinner you can slice it, the better. Seriously, I can't stress it enough. Mine are less than 1/4inch thick.

Slicing thin pieces of bread can be difficult to do. What will help is a super sharp knife. So grab the sharpest one you have. If you slice it too thick, it won't toast up to be crispy. This recipe calls for a completely crunchy crostini- think crouton crispy. Just say no to soft centers~! =)


Line them up on a cookie sheet and coat them with olive oil. Make sure you do both sides.


It's easier if you use Pam olive oil spray, as opposed to brushing it on. It'll take 30 seconds to spray each side.


When you bake them, let them get golden brown, but be careful not to let it get too dark. You'll have to return them to the oven for about 5 minutes to melt the cheese later, so if you let them get too dark now, they'll burn later. Set aside. (Since they're totally crisped through, they will not get soggy if left on the pan.)

(2) Caramelized Pear


You'll want to pick some ripe pears. However, they still need to be firm.


Peel and dice into small, one centimeter cubes.


Melt butter, cinnamon, and brown sugar. Let it simmer and thicken. Then add a small amount of apple juice. Let simmer some more, stirring continuously.


Add the pears and let it cook down and thicken some more.


When done, it should look like a thick and gooey apple pie filling.

(3) Assembling the Crostini


You'll need crumbled Gorgonzola and small slices of Brie.


You'll also some chives. Make sure to chop them into tiny pieces.


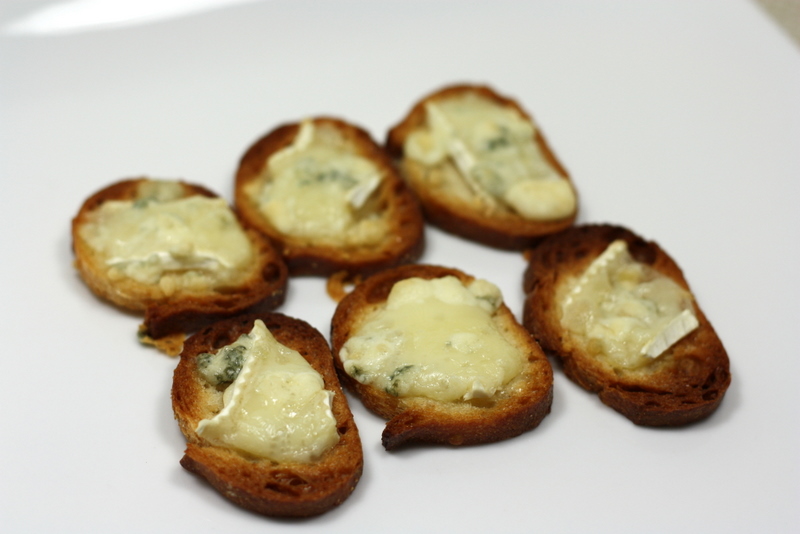
First top the crostini with Brie. The Brie tends to get really sticky, so it's easier just to smear it onto the crostini, like you would butter.


Then, top with Gorgonzola. Generously. Very very generously.


Return to the oven for about 5 minutes to melt the cheese.


Top with the caramelized pear.


Then sprinkle with chives. You're done! Serve immediately or they'll get soggy.


Ok look, I don't want any of you to get weirded out by all these seemingly different flavors mashed up together in one crostini. It might sound gross - you know, the sweet with the savory. But TRUST ME. This is the most amazing combination of flavors your tongue will ever experience. Everyone who's ever tried this has been super amazed by its deliciousness. The flavors just work. I can't explain it. It just tastes really gourmet. The flavors are very sophisticated and compliment each other in the best way possible.

You'll just have to try it yourself and prepare to be blown away! Seriously, try it for nothing else other than your curiosity. And to surprise all your friends. It'll be fun to see their reactions, I promise. =)


CLICK HERE for the recipe

Wednesday, November 11, 2009

Ratatouille Crostini

I love ratatouille. The movie was incredibly cute and the dish is insanely delicious! If you've never had this dish, made famous by the Pixar movie, you must try it immediately! (Tyler Florence, one of my favorite Food Network chefs, has a great recipe online.) It's a big crowd pleaser and always a staple for Italian Nights at my house.


This weekend, when I was craving it again (something that happens frequently), I decided to spice things up by turning this classic side dish into a beautiful and oh-sooooo-delicious appetizer. What can be better than ratatouille piled high on crispy, herb seasoned crostini?


Here's what you'll need: onion, garlic, tomato, eggplant, zucchini, fresh fennel (aka sweet anise), fresh basil, mini fresh mozzarella balls, 1 baguette, tomato paste, and anchovy paste.


First, slice your bread at a diagonal, into 1/4 inch thick pieces.


Place them onto a cookie sheet and brush both sides liberally with olive oil.


Season with garlic salt and Italian Seasoning.


Bake at 425 degrees F for 10 minutes, or until golden brown.


Next, place fresh basil leafs on each crostini.


Get the smallest fresh mozzarella balls you can find. That way, you won't have to worry about slicing them. I got these super tiny ones that were about the size of mini marshmallows!


Three of them fit perfectly on one crostini. But before you pop them back into the oven again, start on the ratatouille topping. We want to melt the cheese at the last minute, when the topping is ready to go. So just set them aside for now.


To prepare for the ratatouille, you'll need to slice the zucchini and eggplant into thin rounds. Try to get a skinny eggplant like the one pictured above in the ingredient photo. It's called a "Chinese eggplant," and you can usually get it at health food stores like Whole Foods, or Asian food markets like Uwajimaya. If you can't find one in your area, you can use a regular one and slice them into pieces that will fit onto your crostini. I chose the skinny type because it's easy to slice and will fit automatically onto your crostini when chopped into rounds. Same goes for the zucchini- you want something small and thin.

You'll also need to dice an onion and the sweet anise/fennel. Don't confuse the fennel with what you would find in a jar in the spice aisle. Those are dried fennel seeds and not what we're looking for. We want the fresh kind.. it's a bulb, with green "hairs" sticking out of it. You want to trim the greens off and dice the bulb itself. (See ingredient photo above; it's the funny looking thing in the bowl, above the tomato.) You can find it at practically any grocery store, you just have to ask someone. It's usually stuck in an obscure corner, and they will only have one or two because it's not a popular vegetable. Fresh fennel is super fragrant and will contribute a fantastic layer of flavor to the dish. Don't worry if you smell it and think "ew!" I really dislike the smell of fresh fennel, too. But once it's in the dish, it does so much for the overall flavor of the dish, and you won't be able to taste the smell, if that makes sense. =)


You'll also need to mince some garlic and dice the tomato. (Please disregard the fact that the picture above is showing chopped garlic, when the recipe calls for minced. lol.) Make sure to scoop all the seeds out of the tomato, or else you'll get a super liquidy topping that will turn your crostini to mush.


Start by heating up 2 tbsp of olive oil on medium-high heat. It's important that you wait for the oil to be hot before starting. You can check by hovering your hand about 4-5 inches over the pan. If you feel the heat on your hand, then the oil is good to go. lol. Very unscientific, but it works. Ok, so drop half of the chopped garlic and 1/2 tbsp of tomato paste into the hot oil. Immediately start stirring it rapidly, breaking up the tomato paste as well as you can. You want the flavors of the garlic and the tomato to come out during this process. Wait until the garlic is starting to slightly brown- but don't burn it! This process will happen super fast- like 30 seconds, because your oil is hot. Once your garlic is starting to brown slightly, pour in the chopped zucchini, and start tossing immediately. Cook the zucchini for about one minute, and then add in the eggplant.


The eggplant will soak up all the moisture in your pan, making the veggies dry and easily burnable. You can rectify this by adding 1 tbsp of olive oil right after adding the eggplant. Tossing the veggies periodically, let the mixture cook for about 3-4 minutes, until the veggies have become fully cooked through (they will look kinda wilted).


Transfer the veggies immediately to a plate so that it doesn't continue to cook.


Now, start of the other part of the ratatouille. The first step is the same: heat up olive oil until it's hot, and then dump in the rest of the garlic, but with anchovy paste this time. Stirring rapidly, cook until the garlic starts to brown slightly, then immediately add the onion, garlic salt, and fennel.

I wrote this in an earlier post, where I did Bruschetta Crostini, regarding anchovy paste:

"Ok, at this point I'd like to digress for a second to speak to all you Anchovy Haters out there. lol. I know you are out there because I used to be one too. When researching recipes, I would always skip the ones that called for anchovy or anchovy paste. It's just plain disgusting. And the smell is terrible. However, I decided to be brave one day out of the blue and give it a shot. Mainly because one of my favorite chefs, Tyler Florence, called for it in one of his dishes. And it was a recipe that I was unwilling to pass up. To my utter surprise, it didn't taste like how it smells! In fact, you don't notice it at all...but it gives the dish something extra. It makes it super savory and gives it a deep, rich taste. Not like smelly fish at all. So I implore all you Anchovy Haters out there to give it a shot! You will be reformed, like me."


You want to cook the onion and fennel mixture for about 8-9 minutes, tossing periodically. When it's starting to caramelize and brown, toss in the tomatoes.


The tomatoes will cook fast. So you'll only need them in the pan for about 1-2 minutes. You don't want to over-cook them. Once they start to darken in color a bit, the veggies are done. Immediately transfer to a bowl, so that they don't continue to cook.


While you were finishing up the veggies, pop your crostini back into the 425 degree oven for about 5 minutes, just to melt the cheese.


Once everything is ready to go, place your crostini onto a serving platter and create a little assembly line: (1) the crostini (2) the eggplant/zucchini mixture and (3) the onion/fennel/tomato mixture.


First, top the crostini with alternating slices of zucchini and eggplant.


Then scoop small spoonfuls of the onion/fennel/tomato mixture on top. Serve immediately.


Aren't they gorgeous?? All the beautiful colors make it a delightful party appetizer!

Hubby and I absolutely loved these. They were so delicious and filling! We ate the entire batch and nothing else for lunch on Sunday. =)

It's a great way to get your picky hubby or kids to eat their veggies! Even people who hate eggplant/zucchini/anchovy will love this dish. It's funny that a lot of weird things go into this dish but they miraculously create something super delicious. I don't particularly love any of the individual ingredients. In fact, I detest a few of them (fennel, anchovy, etc), but it just amazes me that somehow this dish turns out amazingly delicious every single time! Give this recipe a try, especially if you dislike all or some of the ingredients. I grantee that it'll become a staple at your house too! =)


Judy's Ratatouille Crostini
For the recipe, click HERE


Thursday, September 17, 2009

The Julie/Julia Bruschetta Experiment

When Julie & Julia came out, I just had to go see it. It was about food and blogging- my two favorite things! Hubby refused to go. No surprises there. So I went with Colleen, an equally enthusiastic friend. There was one scene that we both remember very vividly even now, months after watching the movie.

In this scene, Julie was cooking something that looked like a face-up sandwich. She pan fried pieces of french bread and topped it with what looked like bruschetta. Except, it was cooked bruschetta! She sauteed the tomato in olive oil with seasoning/spices and it looked so delicious! Ever since watching the movie, I couldn't get this bruschetta thing out of my head and I obsessed about it for a good long time.


I finally decided to buy a bunch of ingredients and experiment to see if I could come up with something that looked equally as delicious. It was a bit of a challenge because I didn't know what it was supposed to taste like! But I decided that I would be appeased if it was yummy and was produced by using similar cooking methods. lol. Yet another one of my crazy kitchen adventures!


You'll need tomatoes, fresh basil, small balls of mozzarella, and a baguette sliced into pieces about 1/2 inch thick. Other ingredients: capers, anchovy paste, salt, olive oil.


First, start on the tomatoes. Heat olive oil on high heat until it's hot (you should see thin white smoke when this happens). Pour in garlic and anchovy paste (pictured left). Stir quickly until well mixed, but make sure your garlic doesn't burn. This should take about 30 seconds. Next, pour in the tomato, capers, and a pinch of salt (pictured right). Stir quickly again, for about 30 seconds and remove from heat. Transfer to a bowl so that your tomato doesn't continue to cook.

Ok, at this point I'd like to digress for a second to speak to all you Anchovy Haters out there. lol. I know you are out there because I used to be one too. When researching recipes, I would always skip the ones that called for anchovy or anchovy paste. It's just plain disgusting. And the smell is terrible. However, I decided to be brave one day out of the blue and give it a shot. Mainly because one of my favorite chefs, Tyler Florence, called for it in one of his dishes. And it was a recipe that I was unwilling to pass up. To my utter surprise, it didn't taste like how it smells! In fact, you don't notice it at all...but it gives the dish something extra. It makes it super savory and gives it a deep, rich taste. Not like smelly fish at all. So I implore all you Anchovy Haters out there to give it a shot! You will be reformed, like me.


Ok, back to business. Very generously coat a griddle with olive oil. Make sure that all parts of the bread touching the griddle has olive oil on it. We're basically searing it in oil to make it super flavorful and crispy. Cook on medium-high heat for 2-3 minutes. It should have a golden brown crust on it at this point! Before flipping to the other side, generously brush the tops of the bread with olive oil and sprinkle with salt.


After you flip the bread, place the mozzarella on top. It won't have enough time to melt, but it will be slightly warmed. Cook for another 2-3 minutes and remove from heat. Place on a platter and...


...top with fresh basil and the bruschetta. This can be served right away while it's warm or served when it's cooled. It's yummy either way!


Yum! I made this dish at a Sunday afternoon BBQ with Colleen and her hubby. It was a huge hit! She immediately recognized that this was from the movie!

Colleen watched me make it and was slightly wary of the anchovy paste when I brought it out. I assured her that it would be okay. She really enjoyed the dish and didn't notice/mind the anchovies at all! Told ya so! She even ended up asking for the recipe. =)

These would be great to serve at a party as finger food. You'll definitely wow your guests with its crispy seared baguette and super savory taste!


My very unscientific recipe (work with me here):

1 loaf of baguette, cut into pieces about 1/2 inch thick
1 cup of tomatoes, diced
1 - 8 oz tub of fresh mozzarella (get the small ones, slice them in half. you'll need about 15 of them)
2 cloves of garlic, minced
1/2 tbsp anchovy paste
1/2 tbsp capers (optional)
fresh Basil
pinch of salt
olive oil

First, start on the tomatoes. Heat olive oil on high heat until it's hot (you should see thin white smoke when this happens). Pour in garlic and anchovy paste. Stir quickly until well mixed, but make sure your garlic doesn't burn. This should take about 30 seconds. Next, pour in the tomato, capers, and a pinch of salt. Stir quickly again, for about 30 seconds and remove from heat. Transfer to a bowl so that your tomato doesn't continue to cook in the pan.

Very generously coat a griddle with olive oil. Make sure that all parts of the bread touching the griddle has olive oil on it. Cook on medium-high heat for 2-3 minutes. Before flipping to the other side, generously brush the tops of the bread with olive oil and sprinkle with salt. After you flip the bread, place the mozzarella on top. Cook for another 2-3 minutes and remove from heat. Place on a platter and top with fresh basil and the bruschetta topping.
Related Posts with Thumbnails