Showing posts with label Tom Douglas. Show all posts

Thursday, January 7, 2010

English Muffin Breakfast Sandwiches


Behold: beautifully browned English muffins!

Ok, I know that English muffins aren't exactly the most exciting thing ever, but work with me here. Give it a chance. Read through this entry first and then decide to write it off or not. This way, you can rest assured that you're making an informed decision!


Truthfully, I've never really given these a lot of thought. I always preferred other breakfast items and only on occasion would we buy a pack of them. They never seemed like anything special to me and there were so many better things to consume for breakfast... like lattes and pastries.

But recently, we've had an obsession with Dahlia's Bakery, a Tom Douglas restaurant that's super famous in Seattle. If you'll remember, the Coconut Cream Pie that I recently did was one of his amazing recipes. On a few consecutive Sundays, we've driven all the way out to Seattle and back just to have breakfast there. It's worth the effort!

Hubby has been obsessed with one of their breakfast sandwiches (and with good reason). It's the most amazing thing ever and quickly became one of our favorites.


It's a freshly baked and toasted English muffin sandwich with melted cheddar, a fried egg, crispy bacon, and fresh arugula. Mmmm... now there's something to wake up to!

I never thought I'd be inspired by something as mundane as an English muffin. But I guess if anyone could turn the mundane into inspiration, I shouldn't be surprised that it would be Tom Douglas!

I found a great recipe on Tracey's Culinary Adventures. I was surprised at how fun it is to make these! The recipe is actually pretty involved, for something that's so seemingly plain. I felt like I was reading a suspense novel, with lots of unexpected twists and turns! Ok, I exaggerate. But only a little.


I used the paddle attachment for this one.


Combine sugar, flour, salt, and yeast.


Mix in butter and milk until all of the dry ingredients have been combined.


Knead the dough for about 10 minutes on a floured surface until it passes the window pane test. (Click on the link I've provided for more information on this test. They explain it better than I can and have pictures to illustrate.) Basically, your dough should look like a thin window pane when pulled apart. You can also test it via temperature. Your thermometer should register between 71 and 88 degrees F. If it passes either one of these tests, that means you've kneaded the dough enough and you can allow it to rest and rise.


Once you've kneaded it to perfection, lightly oil a bowl and roll the dough to coat. Cover it in plastic wrap and allow it to rise in a warm place. The "warm place" part is crucial, as I figured out the hard way! My house was really cold and there was a draft from someone leaving the sliding glass door open, so I had to let it sit twice as long, and I even turned on a burner near it.


But don't worry, it'll eventually rise! Double, in fact!


Sprinkle a parchment lined pan with corn meal.


Flatten your dough into a rectangular disk and cut into 6 equal pieces.


Roll each piece of dough into a ball and place them on the pan. Make sure to space them evenly apart because they will rise again! Sprinkle with more corn meal on top and cover loosely with plastic wrap. Allow them to sit in a warm place until they've doubled in size.


Ta-da! They turned out to be huge!


Ok, here's where it gets interesting! Transfer them onto an oiled skillet and brown both sides. What I tell ya? Exciting, is it not??


This won't cook them completely through, but it will give it the beautiful brown crust that English muffins are known for!


After you've browned them on both sides, place them on a cookie sheet and bake at 350 degrees F for 5-8 minutes.


They turned out so beautifully! I agree with Tracey, they were definitely super light, fluffy, and oh-so-delicious! Have you ever had one straight out of the oven with warm melted butter?! Now there's something to get excited about! I've been missing out all these years with the store-bought kind. Maybe that's why I've always been luke-warm about them- I've never had a homemade one! It's amazing with jam too!

Anyway, onto this Tom Douglas sandwich! It's super easy to make.


Fry an egg in olive oil so that you have a little "egg patty." Brown up some crispy bacon! I like to use thick cut, center sliced bacon. It's the best!


Cut an English muffin in half, then butter and toast it with a slice of cheddar on top, so that it melts and becomes deliciously gooey!


Top with the crispy bacon...


...add your fried egg patty...


...and finish it off with some fresh arugula!


Only one thing to do when you've go something this amazing in front of you: PIG OUT!

I'd like to encourage everyone to give these a try! It's super easy and fun to make. Everyone deserves to know what a real English muffin should taste like! You'd be surprised at how much of a difference it makes!


Click HERE for the English Muffin Recipe!

Thursday, November 19, 2009

Triple Coconut Cream Pie

Hi All, sorry for the late post this week! (I post twice a week, once during M-W and once during Th-Sun). I've been really under the weather, so instead of blogging, I've been sleeping for most of the week.

Anyway, I've been so incredibly excited about this recipe ever since attempting it last Friday. I've been dying to share it with all of you! It sure is something to rave about! In fact, I love it so much that I feel compelled to bully all of you, my readers, into making this pie immediately after reading this entry! Don't collect $200, don't past "Go," just go directly to your kitchen and begin to bake! =)

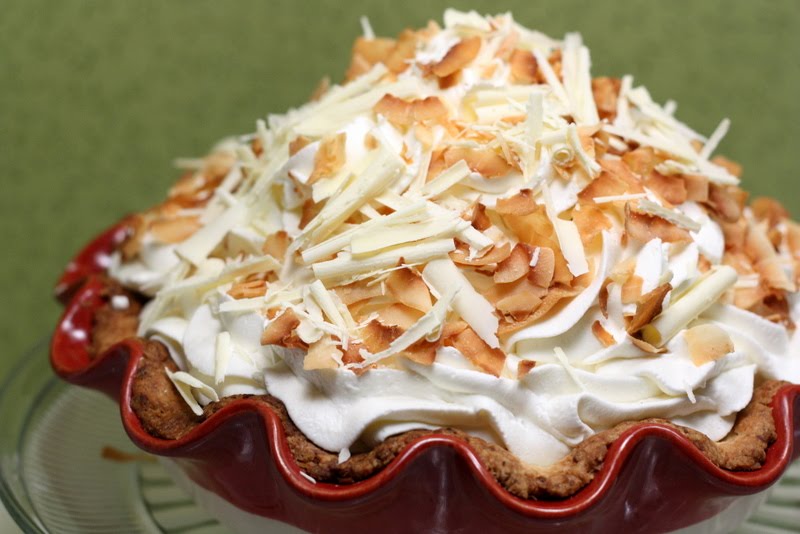
Because it's none other than Tom Douglas' famous Triple Coconut Cream Pie!


*sigh* Isn't it gorgeous?


Here's another photo of the pie, in case you missed the first one.

Ok, so I hate coconut. Absolutely can't stand it. Seriously. I never order anything coconut. So when my friend, Bryn, fellow foodie and blogger, emailed me about a coconut pie at Dahlia's Bakery, I was super skeptical. She raved about how people who don't even like coconut will like this one, and said something about it providing inspiration to me, because it was just that good. I didn't really understand how my least favorite ingredient can provide inspiration. So, incredibly wary, I Googled Dahlia's and found their menu online. They had some mouthwatering selections. Interesting.

So apparently Bryn's dad is a huge food fanatic and fan/friend of Tom Douglas. The guy apparently does guest posts for Tom's blog! Like it's, you know, no big deal or anything. Insanely cool! So I Googled this pie of Tom's and apparently it's been the #1 famous dessert in Seattle for like 12 years. And apparently every Seattlelite has tried it. Furthermore, even the out-of-towners seem to know about it and it's become a major food attraction. Say what?! I felt ashamed in that moment- I mean, I've always prided myself on being a true Seattlelite, and now that statement seemed to be false. How can I call myself a true Seattlelite if I've never tasted Seattle's most famous pie?

It seemed like the pie now had something to prove. And I had something to prove. If trying this pie would turn me into a true Seattlelite, then eat this pie, I will! Besides, being a passionate coconut hater, I dared this pie to change my mind about that ugly, hairy, and entirely unappealing tropical fruit.

We went that very weekend. Yup. Made a trip into Seattle especially for this pie, braving the wind, the rain, the awful Seattle traffic, and the high probability of not being able to find parking. All for this pie.

The moment I sunk my teeth into it, I thought I had died and gone to Fat Kid's heaven. It was utterly amazing. And I was speechless. It was everything that Bryn promised it would be! The crust was so buttery and flaky. The filling was so creamy, subtly sweet, and light on the palate. And all the while, there was a subtle hint of coconut. I loved it. It was simply divine. I had been inspired. I wanted to run back to my kitchen and attempt to replicate it immediately! Thank you, Bryn!

I was all prepared to research coconut pies for about a month to try to recreate the recipe, when Bryn casually mentioned that she thought her dad had said something about the actual recipe being in one of TD's cookbooks. But she didn't mention which one. So I thought I'd try Googling it. And what do you know? The recipe is everywhere! I can't believe that he would share this recipe with the world! Heck, any other person would've kept it a secret!

I wanted to see if I could execute the recipe and produce something as good as the one I tasted at Dahlia's. So I set out to find only the best ingredients. Because TD's famous pie deserves only the best.


The recipe called for shredded coconut and coconut flakes. I took one look at the shredded coconut at Safeway and thought "ew." So I went off to Whole Foods. They had these beautiful organic shreds and flakes in the bulk food aisle! It wasn't waxy and heavily preserved like the ones you get in a bag at Safeway!


I also got this organic Madagascar vanilla bean that sold for an incredible $170/lb! Luckily, this single vanilla bean was only $3.50. But can you believe the price?! Anything for this amazing pie~!


(1) The Coconut Pie Crust


Combine flour, sugar, shredded coconut, and salt into a food processor. Pulse until you get a crumbly mixture. Then add 3-5 tablespoons of ice water, one tablespoon at a time, until you get this crumbly mixture.


Press the dough into a disk and cover with plastic wrap. Refrigerate for about an hour.


Emile Henry 4 Life! This is the only baking dish that I ever use for pies. Why? Because it has magical pie baking abilities. Yup, it'll give you a perfectly even, golden, and flaky crust every time. Even novices can bake a perfect pie in this baby. I have two large ones and four small ones. lol. Excessive? Not at all.


You know the drill. Roll out the dough on a non-stick surface, preferably with a non-stick rolling pin. Transfer it to your pie plate and cut off the edges.


Return to the fridge for about an hour before baking.


Once the pie dough is properly chilled, place a piece of parchment paper over the pie pan and pour in some ceramic pie weights or beans. Bake for about 20 minutes at 400 degrees F, then remove the parchment paper and beans. Continue to bake for another 14-17 minutes. Keep an eye out. If the edges get too brown, cover it with foil.


Beautiful and perfect! EH does it again!


(2) The Coconut Pastry Cream


Combine milk and shredded coconut into a medium sauce pan.


Split your vanilla bean in half, scrape out the seeds, and add everything to the sauce pan.


Stirring occasionally, bring the mixture up to a boil.


Now, in a separate bowl, whisk together flour, sugar, and eggs until well combined.


Temper the eggs by adding a small amount of the boiled milk & coconut mixture into your egg mixture bowl while whisking. This will keep your eggs from getting scrambled.


Now pour everything back into the medium sauce pan. Whisk over medium-high heat until the pastry cream thickens and begins to bubble. Keep whisking until the mixture is very thick, 4 to 5 minutes more.


Remove the saucepan from the heat. Add in butter and whisk until it melts. Remove and discard the vanilla pod.


Transfer the pastry cream to a bowl and place it over a bowl of ice water. Stir occasionally until it is cool. Place a piece of plastic wrap directly on the surface of the pastry cream to prevent a crust from forming and refrigerate until completely cold. The pastry cream will thicken as it cools.


(3) The Whipped Cream Topping


It's better to use a stand mixer for whipped cream. Why? Cuz I'm lazy.


Use 2 1/2 cups of chilled heavy cream.


Add 1/3 cup of sugar.


Beat on a medium-high speed until stiff peaks form.


A few minutes later, you've got whipped cream! So easy, I could do it in my sleep.


(4) The White Chocolate and Coconut Garnishes


And now for the garnishes- there are two that go on top: white chocolate curls (yum!) and toasted coconut flakes.


I got a really good bar of chocolate from Whole Foods. The real kind with cocoa butter. YUM! You'll need a good peeler. Mine has a ceramic blade that is super heavy duty and won't rust. Only cost like $10 at Sur La Table. A great investment. And it's red! Practically the color of every kitchen utensil I own. hehe.


Here's a trick to getting really smooth curls: hold your hand over the bar for about 30-60 seconds to warm it up before running your peeler over it. It'll give you really smooth, giant chocolate curls! If your chocolate is too cold, you'll get flakes.


To toast your coconut flakes, place them on a cookie sheet and bake for about 7-8 minutes at 350 degrees F. Stir them every 2-3 minutes.


In the recipe, TD says that they brown fast and will burn easily. He wasn't kidding! You really have to keep an eye out on these. I almost burnt mine! See how they're super dark?


(5) Assemble the Pie


First, smooth the pastry cream into the cooled pie shell.


Place your whipped cream into a pastry bag with a jumbo tip.


Pipe on your whipped cream to get beautiful giant swirls!


Garnish with lots of white chocolate and coconut flakes!


Keep chilled in the fridge until ready to serve. It will only be good for about 24 hours. If you leave it for 48 hours, the crust will get slightly soggy.

Wow, so I don't know if it was my super high quality organic ingredients or my meticulous attention to executing this recipe, but the pie was glorious! It tasted just like the real thing! The pastry cream and whipped cream was so light and fluffy~! And even with my super expensive ingredients, it was still less than what you would pay at Dahlia's ($35) !

And now, not only have I tasted the pie, I have made it in my kitchen. I am officially a true Seattlelite! lol.

My friend Karen took most of it to her family get-together. She said that her family usually doesn't like traditional "western" desserts (they're Chinese), but they loved this pie and consumed the entire thing! I guess Bryn was right- it converts all haters! lol. Karen said she wished there was more crust! I agree 110%. The crust is always the best part of any pie, in my opinion. mmmm....caaarbs! This one was especially unique because it had coconut shreds in it. =)

Alright, so....now is the time to get out of your chair and go straight to your kitchen to try out this recipe!


Tom Douglas' Triple Coconut Cream Pie
From Tom Douglas' Seattle Kitchen

Please click HERE for the entire recipe.


Related Posts with Thumbnails